
Please Leave Us A Message
Privacy statement: Your privacy is very important to Us. Our company promises not to disclose your personal information to any external company with out your explicit permission.
 wuxi top mixer equipment co.,ltd
ISO9001:2008
Installation, Use and Maintenance Manual of TOP Mixer

Wuxi Top MIXER Co., Ltd
explain
This manual is for the installation and commissioning of the mixer. Before installation, please read this manual carefully, and train the installation personnel to enable them to master the necessary mechanical knowledge, ensure safe operation and standardized operation. During the operation, put this manual where the operator can see it at any time. At the same time, please keep this manual properly for future maintenance and repair reference.
In order to prevent safety accidents and property losses, please be sure to comply with the provisions described in the manual, and pay special attention to the contents of [Caution] and [Warning] mentioned therein.
Please check this manual if you do not understand it during installation. If you do not understand it or have questions, please contact the manufacturer in time. Do not change it or conduct non-standard operations. If you change the installation rules without authorization, the manufacturer will not be responsible for any safety accident or property loss.
catalogue
1.Structure diagram and related components-----------------------------------------------4
2.Precautions related to installation----------------------------------------------------------6
3.Installation Steps and Methods and Installation Inspection----------------------------7
4.Operation and commissioning--------------------------------------------------------------8
5.Operation and Maintenance Instructions for Reducer-----------------------------------9
6.Equipment storage---------------------------------------------------------------------------14
7.Motor wiring diagram-----------------------------------------------------------------------15
I Structure diagram and related components
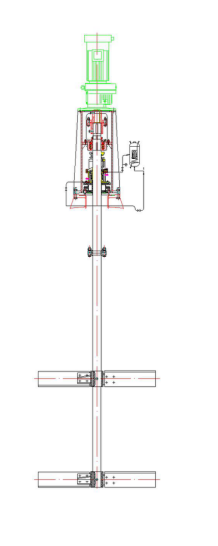
Particularly important: ① Before starting the bearing assembly, ensure that the bearing is full of grease, and the mixer has been greased here before leaving the factory. The bearing of the new mixer shall be filled with high-temperature grease after 100 hours of operation, and then the high-temperature grease shall be filled every 2-3 months. (See general assembly drawing for mixer structure)
II Precautions for installation of mixer
2-1-1 Inspection and precautions before installation
be careful; Please fully consider the dynamic load of the mixer, and the mixer or equipment should be installed on a rigid enough foundation;
Warning: for the hoisting and handling of each component of the mixer, the weight of the component shall be fully considered, and overload handling of the hoisting equipment is strictly prohibited; When lifting the mixer, it is absolutely forbidden to use the end of the mixing shaft to bear the weight of the whole mixer when the mixing shaft is assembled;
be careful; The levelness of the mixer installation surface shall be controlled within 0.1mm/m;
Note: Before installation, please check the mixing equipment for missing parts and damaged mating surfaces,
Warning: It is strictly prohibited to directly knock the finished surface with matching requirements when installing the mixing equipment,
Especially important: after the new mixer runs for 100 hours, the bearing shall be filled with high-temperature grease once, and then every 2-3 months.
III Installation steps and inspection of mixer
1) Installation of frame and reducer: install the reducer on the frame (the assembly of motor reducer can be completed outside the pool);
2) Install the mixing shaft: stretch the upper mixing shaft into the shaft sleeve of the rack (at this time, be sure to pay attention to the matching between the mixing shaft and the mechanical seal) and install it until the upper step of the mixing shaft is against the lower edge of the shaft sleeve (during installation, knock the upper shaft end with a wooden hammer properly to ensure that it is installed in place); After the installation and fitting are in place, lock the lock round nut on the bearing sleeve and fasten the round nut lock washer. Figure 1 shows the picture before the lock washer is not fastened, and Figure 2 shows the picture after the lock washer is fastened. At the same time, lock the lock bolt on the mechanical seal. [Warning: During installation, the round nut must be locked and the stop washer must be fastened. If the stop washer is not locked and fastened as required, the manufacturer will not be responsible for damage to the mixing equipment or other parts];
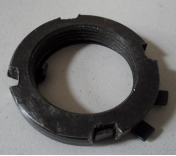
Figure 1 Figure 2
3) Install the mixing blade: install the mixing blade to the designated assembly position on the mixing shaft, and tighten the set screw;
4) Lift the installed mixing equipment and place it on the designated installation kettle or installation platform, and tighten the bolts at the connection between the rack flange and the installation platform;
5) After the mixing equipment is installed, please check whether the mixer interferes with the components or accessories in the tank, and whether the manual turning gear (manually rotating the motor fan blade) operates normally;
IV Operation commissioning of mixer
1) Confirm that the model and specification of motor and reducer are correct before test run; Read the installation and operation instructions of the motor reducer in detail;
2) Confirm that the reducer is filled with proper lubricating oil of specified brand;
3) Confirm that the air vent at the top of the reducer housing is replaced with a vent cap;
4) Check again according to the installation sequence, check whether all the bolts of the mixer are tightened before the mixer starts up, and check again 12 hours after the assembly, and check every time the mixer stops later;
5) It is strictly forbidden to operate the mixer in an empty state. Check and confirm that the liquid level in the tank is above the mixer;
6) The mixing equipment used outdoors shall be equipped with rain proof facilities (rain shed or rain cover);
7) Jog the motor and check that the rotation direction of the mixing shaft meets the requirements of the drawing and does not reverse;
8) The dust on the motor will affect its normal heat dissipation, so always keep the motor clean.
9) Turn the gear manually to ensure that the mechanical seal is installed in place, and the mixing shaft can rotate easily without jamming
After the above inspections are confirmed to be correct, start the test run. Test run for 8 hours, and detect current, temperature, noise and vibration every 1 hour. (The maximum current shall not be equal to or exceed the rated current; the maximum temperature shall not exceed 90 ℃, and the temperature rise within one hour shall not exceed 40 ℃; the maximum noise shall not exceed 90 dB; the maximum vibration of the body shall not exceed 8 mm/s)
V. Operation and maintenance instructions of reducer
5-1 Precautions
1) After the installation of the mixing equipment is completed, the new machine should be renewed with new lubricating oil and cleaned of internal oil stains after one month (200~300 hours) of use. It can be replaced every 2 to 4 months. The service life of lubricating oil shall be shortened in case of bad service environment or continuous working system for more than eight hours.
2) High temperature grease shall be added at the drive bearing part (①) of the mixing equipment frame for the first 100 hours of operation, and then every 2-3 months;
3) Note: Do not hit any part of the reducer with a heavy hammer;
4) The motor shall be wired normally according to its instructions;
5) Before the loaded test run, the no-load operation shall last for about half an hour, and the loaded operation can only be carried out after confirming that there is no fault in the no-load operation (note: the design of flexible shaft prohibits no-load operation);
6) After startup, observe whether the temperature rise, sealing noise, vibration, etc. of the machine are normal. That is, after two hours of load, the maximum temperature rise of the oil pool shall not be greater than 90 ℃.
7) Pay attention to replenish new oil to the required position during use. It is strictly forbidden to mix lubricating oils of different quality, because chemical reaction may occur during mixing, reducing or losing the lubricating effect.
5-2 Oiling method
The reducer part can be filled with oil from the gearbox oil filler of the reducer;
Grease can be added to the bearing part from the lubricating nipple of the bearing seat;
Precautions: Loosen the vent hole when refueling (the reducer vent hole is on the gearbox).
5-3 Daily inspection:
1)Does the current exceed the rating on the motor nameplate?
2)Is there any abnormal noise or vibration?
3)Does the temperature rise sharply and unstably or more than 60 ℃?
4)Is there any oil leakage? Check whether the oil level of the oil pointer is normal?
5)Is the coupling bolt loose? Is the chain or belt loose?
5-4 Installation, lubrication, use and maintenance of reducer
1. The ambient temperature is - 40 ℃~50 ℃ (the lubricating oil shall be heated to above 0 ℃ when starting under 0 ℃);
2. It is not allowed to strike any part of the reducer with a heavy hammer.
3. The motor shall be wired normally according to its instructions. Loosen or replace the ventilation cap before starting up to ensure good ventilation, ventilation and heat dissipation conditions of the reducer and motor. Before starting the machine, be sure to check whether the lubricating oil level meets the requirements (see the installation form in the sample).
4. After startup, observe whether the temperature rise, sealing, noise, vibration, etc. of the rack are normal. That is, after two hours of load, the temperature rise of the oil pool is not more than 45 ℃, and the maximum temperature rise of the oil pool is not more than 85 ℃
5. It is applicable to various working systems and allows positive direction operation;
6. Selection of lubricating oil
| Input power KW | ≤1.5 | 2.2~7.5 | ≥11~22 | ≥30 |
| Brand of lubricating oil | L-CKC/220 | L-CKC/320 | L-CKC/460 | L-CKC/460~680 |
Please select according to the operation and maintenance manual of the reducer
If there are special requirements or experienced users, they can choose other brands of lubricating oil or add additives appropriately. Grease lubricating oil is allowed for small power short-time working models. However, pay attention to the adverse effects of lubricating oil or additives on oil seals (NBR). When the ambient temperature is low, the grade shall be reduced.
Generally speaking, when the brand of lubricating oil increases from small to small, the performance of the reducer will be affected as follows: a. The temperature increases (the degree is obvious when the linear speed is high); B. The efficiency is reduced (obviously); C. Noise reduction; D The sealing performance is enhanced. The bearing capacity of e gear is enhanced.
9. Inspection and lubricating oil replacement
1) The inspection cycle shall not exceed half a year at most, mainly including the noise and temperature rise of the reducer, the color and smell of the lubricating oil. In case of any abnormality, replace the grease in time. If you can't judge, please seek professional support.
9.2) Place an oil receiving container under the oil drain, and then successively unscrew the oil filling plug and oil drain plug until the lubricating oil is completely drained. Tighten the oil drain plug, and fill the lubricating oil with the same brand as that in the reducer. The oil filling amount should meet the oil level requirements. If the oil level mark is an oil plug, the oil plug should be unscrewed, the lubricating oil should be filled until the oil starts to overflow at the oil plug hole, the oil plug and the oil level plug should be tightened, and the residual lubricating oil on the external surface of the reducer should be cleaned up (if not cleaned up in time, it will stick dust and affect the appearance).
9.3) If the lubricating oil needs to be replaced, it needs to be flushed. Flushing method: add cleaning oil or lubricating oil of the same brand, run the reducer for about 30 minutes, drain the cleaning oil in the box, and then add sufficient lubricating oil according to the oil filling requirements.
9.4) Each time the lubricating oil is changed, it is better to clean the vent cap with cleaning agent, clean it with cleaning gasoline or similar cleaning agent, and screw it on the reducer after it is washed and dried or blown dry.
9.5) When changing the oil of the reducer, it is recommended to check the reducer at the same time, and check the torque of each connecting bolt according to the requirements of the instruction manual.
9.6) Pay attention to adding new oil to the required oil level during use.
9.7) It is forbidden to mix lubricating oils of different quality. Because chemical reaction may occur during mixing, thus reducing or losing lubrication.
10. The use and maintenance of the motor shall be carried out according to the operating instructions of the motor.
11. Store in a dry, ventilated and room temperature environment. When the storage period exceeds three months, rust prevention treatment shall be carried out.
12. Check whether the oil seal is aged and the oil is deteriorated when the machine is used after one year.
13. Wearing parts: skeleton double lip oil seal and bearing belong to wearing parts. Due to the great difference of service conditions, it is difficult to determine the service life of skeleton double lip oil seal and bearing.
VI Equipment storage
For improper storage and equipment damage caused by improper storage in accordance with the following requirements, our company
No liability.
6-1 Precautions for storage
Top blender and other precision instruments need to be properly protected when not running for a long time
To prevent corrosion. The main reason for corrosion is that the temperature fluctuation and humidity cause condensation in the machine
Dew. Therefore, the mixer that is not running for the time being should be properly kept in a clean and dry environment to prevent
Anti rust and damage.
Power machinery such as motors should not be stored indoors for a long time, and outdoor storage should not be any motor
Allowed by the manufacturer. If it is necessary to exceed the storage period allowed in the manual, please refer to the motor
Store the instructions in the maintenance manual and strictly follow them.
6-2 Storage of new mixer
Top blenders are treated with high-quality rust inhibitor before leaving the factory. With the storage conditions not
Similarly, these treatments can effectively protect water and steam corrosion for different periods of time, up to one year
above. Outdoor storage without any protection is not allowed, regardless of the environment, unless
Before the mixer leaves the factory, it is specially pointed out that the mixer will be used for outdoor storage and special measures have been taken.
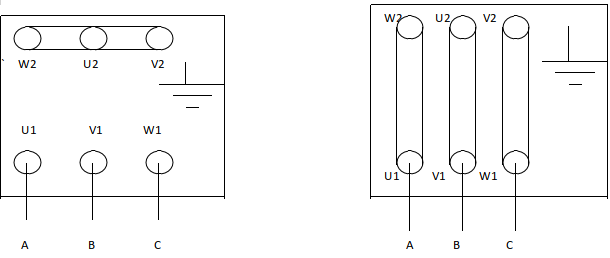
7. Motor wiring diagram
STAR CONNECTION DELTA CONNECTIO
LET'S GET IN TOUCH
Privacy statement: Your privacy is very important to Us. Our company promises not to disclose your personal information to any external company with out your explicit permission.
Fill in more information so that we can get in touch with you faster
Privacy statement: Your privacy is very important to Us. Our company promises not to disclose your personal information to any external company with out your explicit permission.